IDN by Physalia
Entropy is the randomness of the microscopic constituents of a thermodynamic system, and a measure of the loss of information in a transmitted signal or message. It is heat death, it is inevitable social decline and degeneration- in a closed system, it is accountable chaos.

2000 pictures compose this piece- that is, 2000 perfect different water drops into which we mapped an animation. Droplets that behave and look strangely similar at the stage of less entropy, and become more disordely as they splash.
When we got the offer from IdN to create an exclusive logo formation, as happens most times, we thought at first ‘wow, we would like to create something new and test it’. Then we started thinking about the formal shape of such a piece: short, including some animation for the logo. We wanted to find a vehicle for this format that would respect it and at the same time treat it in a different way. We had had in mind for a long time strobe light and water, a mix that renders water in real time in different ways unseen to the eye in normal conditions. We had also seen image projections in photography inside waterdrops, and then we thought “what if we could have both things, the logo formation inside a water drop falling? Could we have replacement animation inside a water drop-and still be able to see it?”. Once the thought enterred our heads, we just had to create a way!
The final result of the piece you have seen has absolutely no CGI, and was shot in stopmotion so as to be able to project inside the waterdrop the logo formation, previously animated in 3D and then printed in paper and placed behind the water drop falling. There were 320 frames printed and replaced frame by frame in the animation, and over 2000 frames compose the final shot- this meaning that the drop you see is never the same, there are 2000 different drops in the piece. In order to be able to photograph each one in exactly the right place as to be able to see a fluid fall, we created an Arduino-based system in which, after having the drop cross a laser pointer, we would have the absolute precision of when to trigger the flashes and camera to see the drop in the right position. We worked very hard to synch this mechanism to our Motion Control system, and the final piece is the result of a 3-week testing process in which we shot about 45 splashing tests with over 20000 pictures taken, before we produced the final shot.
Inspiration and references
We’ve been seeing for a while some very interesting experiments with strobe lights and water drops, and you can find plenty around youtube and vimeo. Here’s a great one found under “time fountain”:
It’s a pretty straightforward concept- a source of light flickering at a given frequency that, when set to the cadence of a constant liquid drippping, gives the impression of the liquid being suspended in space. What happens is that, with each flash, a different droplet is perceived in the same position as the previous one, giving the impression of being static. This flashing is almost unperceivable to the human eye, which can’t see that in between flashes there’s an absence of light for a long enough moment for another drop to reach the right place. This ability (or lack thereof) to perceive a given frequency of images as continous is well known and studied, and is the basis for cinema and TV- persistance of vision.
In all the videos we’ve seen water behaves normally and what is adjusted (by using a controlled flickering source of light) is what we see and what we don’t. Similar set-ups can create the illusion, by regulating the light flickers, of water ascending, stopping or falling in slow-motion. As we scanned the internet, we also found a very important reference for our video: German photographer Markus Reugels,‘s work on fluid photography- a clear inspiration for our piece Entropy.

Water drop by Markus Reugels
The above example is not only a technically brilliant picture, but also combines two very interesting elements. On the one hand, it captures the chaotic and delicate nature of the droplet in contrast to the black and white patterns, whose geometric shapes allow us to perceive the distorted refraction of the background. On the other hand, the checkerboard relates back to a 3D environment, as it is used to check distorion flaws when texturing a 3D object.
With this basis, if we were able to create an electronic system capable of detecting, and therefore knowing where a water drop is, we would be able to shoot its plunge. All of this with the purpose of shooting without needing a slow-mo camera or a huge budget (or even a small one!), just any digital camera and a photographic flash- taking pictures of different water drops and expecting them to behave in a similar way.
The question, as usual, could be: ‘why would you go to such lengths if there already exist slow-mo cameras capable of doing the job?’
What we don’t know of though are STOP-MO LIQUID SLOW-MO shootings, or WATER MAPPINGS-if that makes sense!?
So… what if, by taking advantage of the fact that we need to shoot in stop-motion to capture this plunge, we actually create a stop-motion animation playing with the background and its refraction??
We got it!
Premise
We needed to create a system capable of triggering a camera by a water drop stopping a laser beam. At the same time, the invention had to coordinate camera movement, camera focus and allow us to take a picture with as low as increment as just tens of microseconds.
First step. Detecting the water drop: laser beam-photodiode
There are several ways to detect a droplet by using sensors: infrared barriers, laser beams… In this case, we chose a laser pointer to which we added a switch to make it easier to turn on/off.

Laser pointer and photodiode
We also investigated the fastest electronic component that measures interruption of a laser beam. Among a choice of photoresistors, phototransistors and other components capable of measuring light variations, we ended up using a photodiode. After some testing, we added some resistances in parallel so as it wouldn’t be so sensitive and would only be affected by interruptions of the laser beam, and not ambiance light for example. This tiny circuit is enough to allow the photodiode to work as a digital switch putting out 5v when the laser hits the photoreceptor, and 0 when a water drop interrupts the laser beam. We also placed a cinefoil (a black matte aluminium sheet used in photography) pierced with a needle was placed in front of the laser pointer so as to make it even more precise to the dripping.
Step 2. Triggering the flashes
We’ve been triggering digital cameras using optocouplers for years. Without a second thought, we connected an old-ish flash to an optocoupler (4n28) output and tested the triggering with Arduino. Flash! It worked! But then, and the second try… it DIDN’T. No problem, we changed the chip: Flash! It worked! But then, and the second try… it DIDN’T. AGAIN. So we tried again and again until we run out of optocouplers (burned them all, more like it!). We searched for possible reasons, and we found out that some flashes (especially the old-ish ones) are capable of generating voltage peaks of 300v… and more! That’s why we decided to implement the circuit board descripted in the Photoduino schematic, and it worked like a charm.

Flash trigger
One of the big limitations we also encountered to this effect were the number of flashes used to light the set. Shortly after starting, we realized that lighting the water drops with just two flashes for the whole downward course of the drop was nearly impossible. The picture was underexposed either at the beginning or the end of the journey, and proper constant lighting was impossible to achieve. We decided then to rent two more flashes and build two more flash-trigger circuit boards, but after a new picture, a new problem ensued: the older flashes were much faster than the rented, newer Canon flashes, with the result of a double-exposed picture.

Double exposure caused by flash synch problems
We tried to solve this by programming a delay in the old flashes, and although we almost matched the two speeds, they never really flashed at the same time. So, in the end, we had to make do with just two flashes. The conclusion was that, for a project like this, where a difference of microseconds is paramount, same model and brand flashes are needed. This, added to the limited space in our Lightbox, compromised the final result of the piece.
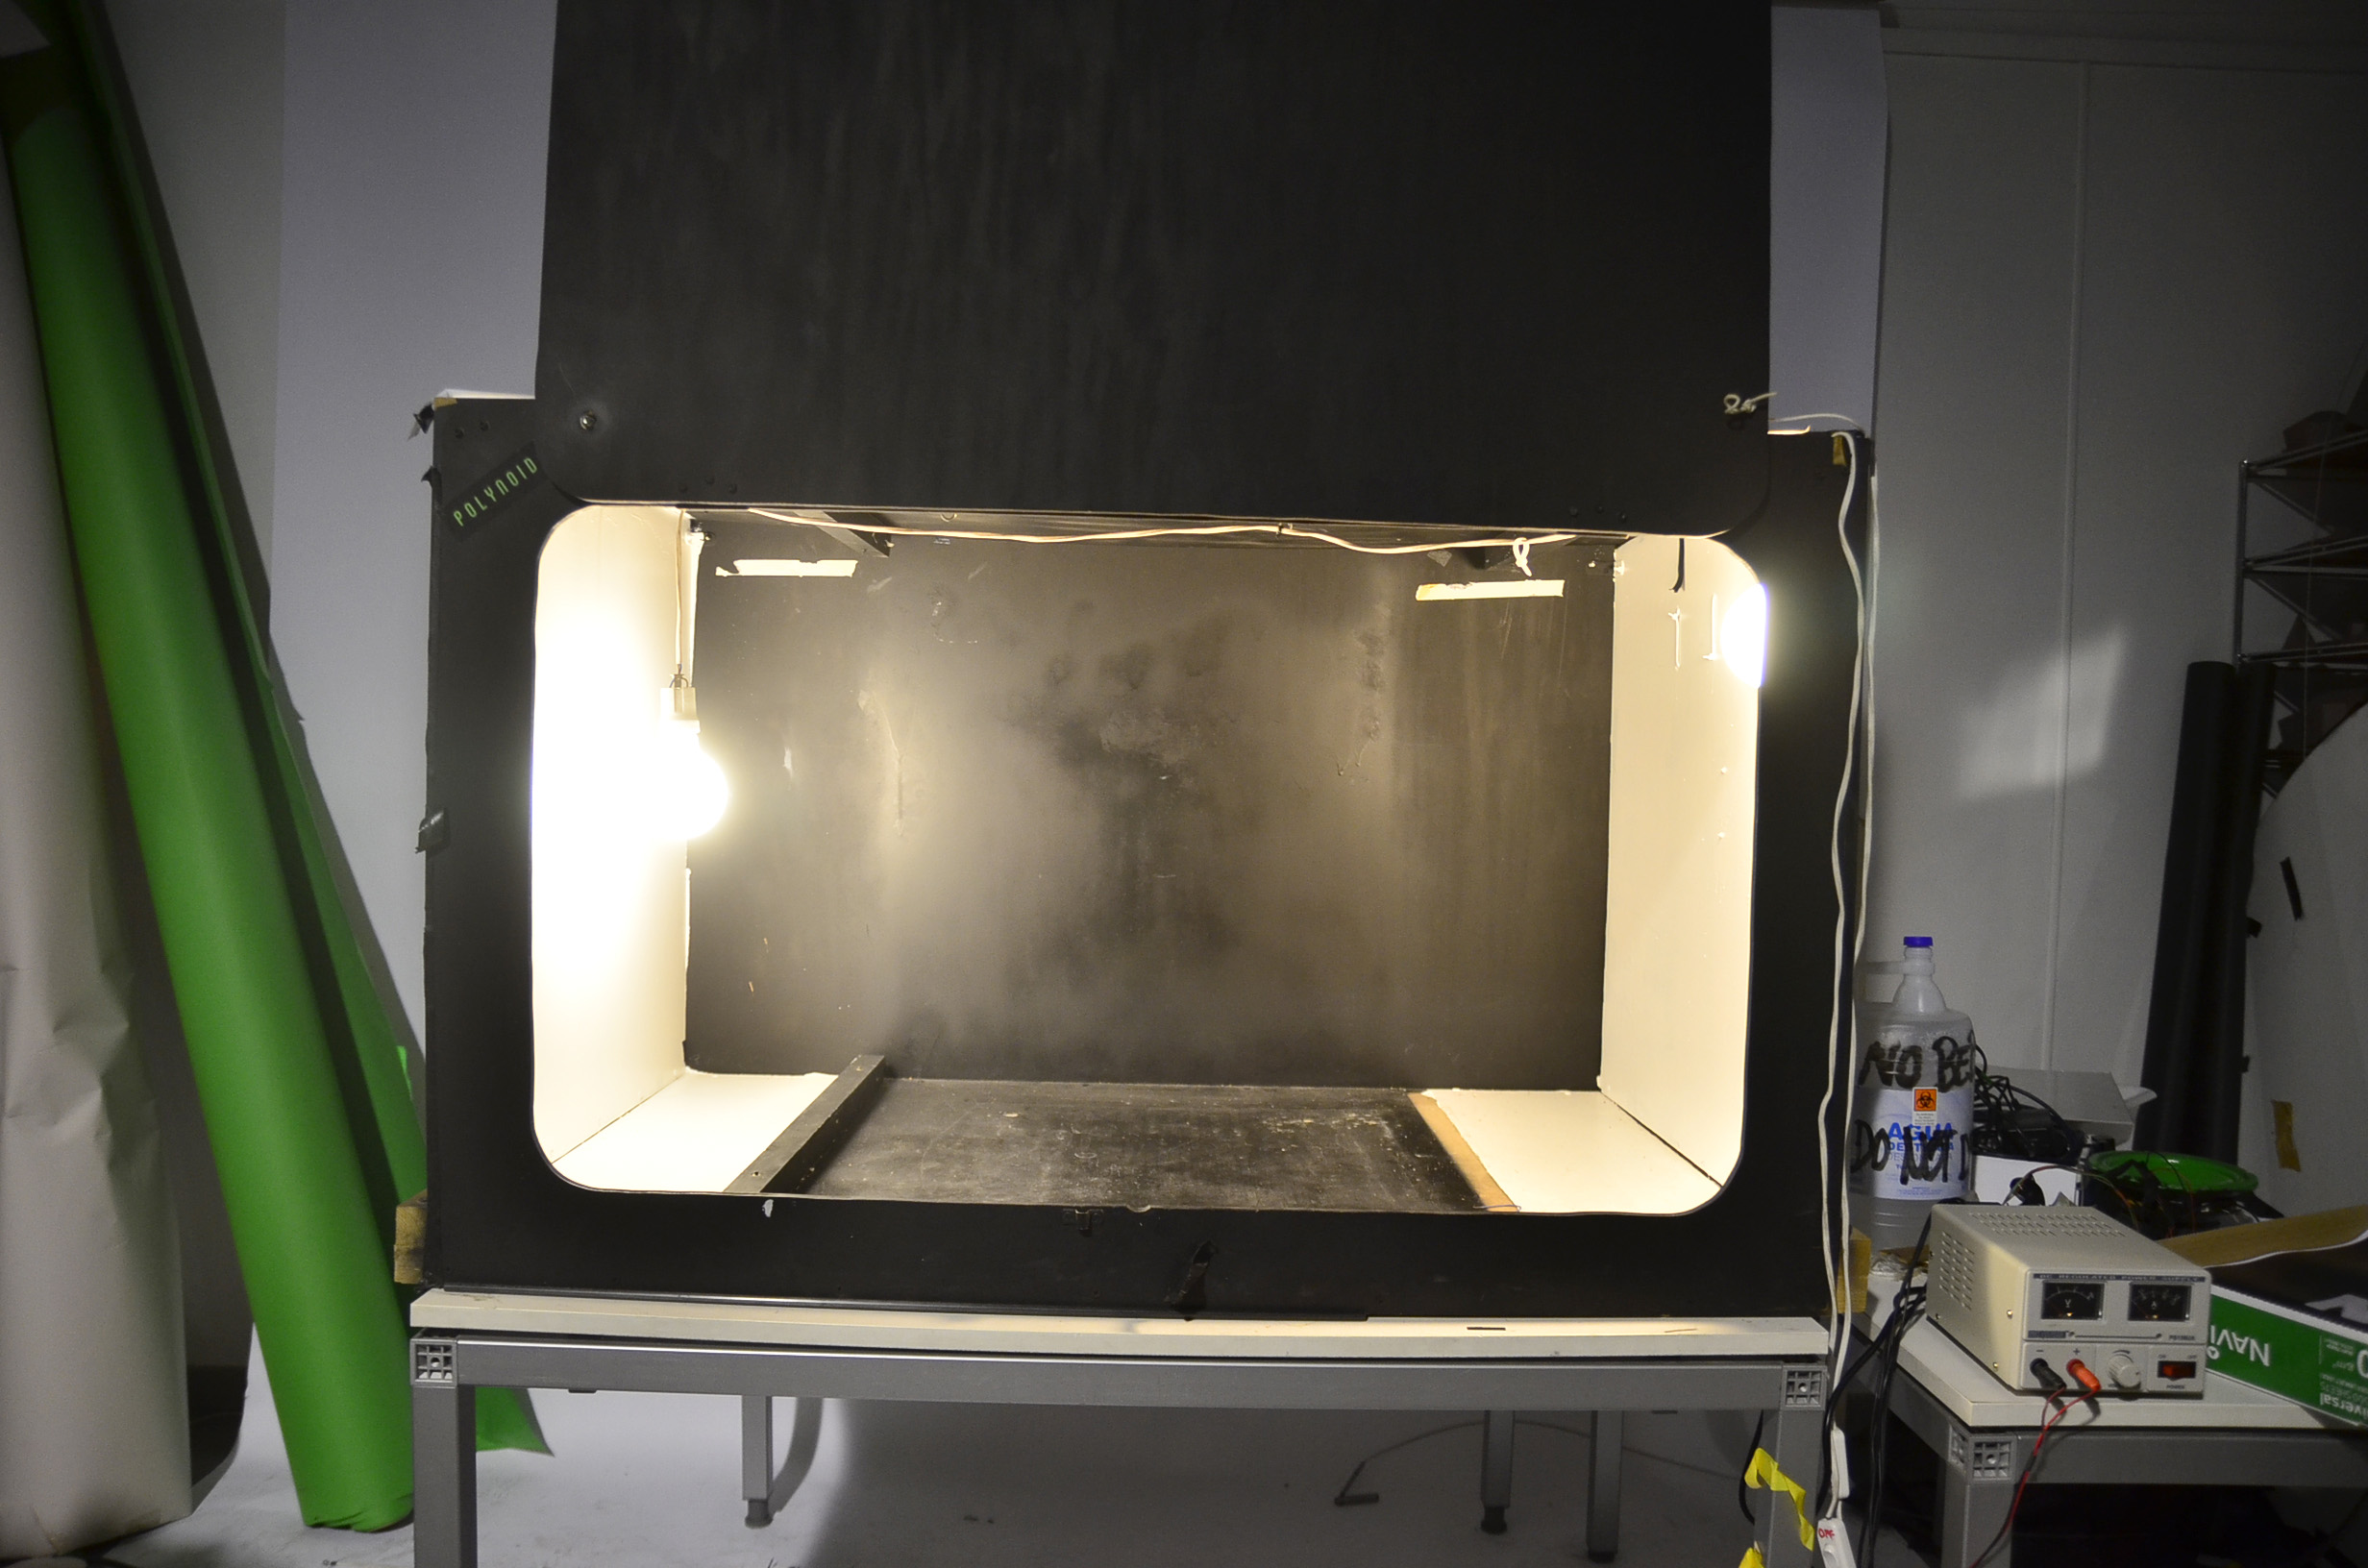
Our Lightbox
Step 3. Triggering the camera (any DSLR or remotely triggered camera)
As usual, a 4n28 octocoupler was used, and don’t be put off by the name- it sounds more complicated than it really is! It is basically a 6 pin IC that acts like a switch. It has a small led inside that is lit when voltage is received and a photoreceptor that reacts, closing the circuit- so basically a switch that can activate or deactivate whatever we connect, with the added bonus of having an isolated input and output. If you are lucky enough to own a digital DSLR or a camera with the choice of connecting a remote trigger, you can use this ic to trigger it for less than 2€. If the camera has a standard audio input for this purpose, so much the better. If the camera has its own brand connectors or different than the usual ones (such is the case with our Canon 7D), we would need to implement any cheap Chinese remote trigger, starting by cutting the cable. After peeling it, we will find 3 wires: a common one and two more. In order to distinguish them, we know that the common one touching the first one will activate the camera focus and the second one will trigger the camera. The common wire and the trigger one connected to the octocoupler output will trigger the camera once the 5v impulse is received. With a second octocoupler, we could also keep the auto-focus function.

Arduino trigger schematic
When considering the present exercise- shooting a water drop- we need to bear in mind that, although the camera is capable of shooting really fast, it is much easier to work in complete darkness and work with the shutter in B, letting the flash be the one capturing the droplet in the air. For minimizing synch problems, we programmed it so the shutter opens when the first droplet passes through the laser beam and the flashes are triggered when the second droplet is in the desired position.
Step 4. Water course
In our first attempt, we used a small water pump capable of taking in water from a plastic tray and pumping it to a regulable medical drip. This direct connection made the water drop tremble when falling because of the motor vibration, which isn’t a very desirable effect when you need two different droplets to look the same! We solved this by using a small recipient in the middle of the set-up that absorved vibration and pressure on the medical drip.

Water course
Step 5. Following the water course – Motion Control
In order to follow the droplet in its downwards course, we needed two basic controls: vertical axis (tilt) and follow focus for the macro lens. We had the Motion Control set up in a different way, so we modified the horizontal axis to be able to control the focus. It ended up being quite ugly aesthetically and the motor was way too big for the purpose, but it worked perfectly. With the lack of the extra pair of flashes, which didn’t allow us to close the shutter a bit more, and the incredibly short depth of field for the macro lens it would have been impossible otherwise to keep focus on the water drop without this adjustment.

Motorized follow-focus
Step 6. Communicating with the Motion Control
Given that we needed to synch the droplet fall to a downwards camera movement, we tried to communicate Arduino with our control software by sending serial prints so the aackeys software would turn it into a keystroke. What we wanted was to get the motor to move in predefined increments so as to follow the droplet falling. It all seemed to work at first, but after some pictures the Arduino would suddenly restart, so we lost the movement. After double-checking all components, changing the programming and pretty much going crazy and wanting to crash the whole set-up, we decided to go ugly and wild, but functional. So we wanted Arduino to simulate a keystroke and we were having serial communication trouble, right? We could also get an innocent soul to press that key 2000 times (as many as frames we wanted to get), and believe us, we tried that for a couple tests and it was pretty painful. But we could also try to emulate Homer’s keystroke bird and build one ourselves with a small servo motor! We did, and worked like a seamlessly.

Homer and his keystroke bird

Our serial keystroke robot
The servo would then press the spacebar after each picture, while the Motion Control would move in small increments and adjusting focus at the same time. We will get into more detail about the Motion Control in a future post, but building a two-axes rig (tilt and focus) is not so difficult, in case you want to attempt the same experiment. The internet has loads of information about it and there are Arduino AccelStepper libraries that make the job much easier. The ingredients would be two stepper motors, two drivers, power supply and an Arduino. The only thing left would be to build a camera rig to your fancy.
Step 7. Arduino programming
As much as we would like to, we are not programmers and programming the whole thing myself would have made the whole process much slower. Our friend Jordi Planas lent a hand and what would have taken me a week was done in a morning with no fuss. We first programmed a small Arduino sketch to control flash and camera according to the blocking of the photodiode light, all in one click. As we were shooting using a macro lens, we installed a potentiometer that would allow us to modify the delay between water drop and flashes without reprogramming the Arduino. We pointed the water surface, focused and started trying different delays (millisecond waits): 100, 120, 190… and the water drop was nowhere to be seen. We kept on increasing the delay, and at around 200-210 milliseconds:

Our first picture!
To test the theory we shot a number of pictures with the same delay and they were all very similar. We also realized that, by getting rid of the potentiometer and any communication with the laptop, the pictures were more and more similar- like two drops of water!
To test the theory we shot a number of pictures with the same delay and they were all very similar. We also realized that, by getting rid of the potentiometer and any communication with the laptop, the pictures were more and more similar- like two drops of water! We then cleaned the code and added some ideas to make the system more trustworthy, like adding a millisecond after each 1000 microseconds to help the Arduino manage such large amounts of figures.
<br />
#include &lt;Servo.h&gt;<br />
int flash1 = 9; // Pin del Flash 1 pin 9<br />
int flash2 = 12; // Pin del Flash 2 pin 11<br />
int laser= 2; //Pin del fotodiodo<br />
int camara = 3; //Pin del optoacoplador donde se conecta la camara<br />
int boton1= 7; //Botón de disparo de foto<br />
int boton2= 13; //Botón de repeticion de foto (no incrementar)<br />
boolean clic1= false; //Buleano para el boton 1<br />
boolean clic2= false; //Buleano para el boton 2<br />
boolean laserState= false; //Buleano del laser<br />
int i=1; //Variable que cuenta las gotas (primera o segunda)<br />
Servo servo1; // Crea un Objeto servo<br />
//int f=0; //Numero de fotos para DEBUG</p>
<p>////////////////////////// TIEMPOS //////////////////////////////////////////////////////////////////////////////<br />
int delai= 0; //Espera en milisegundos para la primera foto<br />
int delaim= 0; //Delay inicial al que se le suma el incremento<br />
int incremento= 250; //Incremento en microsegundos<br />
int guardarfoto= 4000; //Espera de la camara para guardar la foto<br />
/////////////////////////////////////////////////////////////////////////////////////////////////////////////////</p>
<p>void setup(){<br />
//Serial.begin(9600); //Activar para hacer DEBUG<br />
pinMode(flash1, OUTPUT);<br />
pinMode(flash2, OUTPUT);<br />
pinMode(laser, INPUT);<br />
pinMode(camara, OUTPUT);<br />
pinMode(boton1,INPUT);<br />
pinMode(boton2,INPUT);<br />
servo1.attach(6);<br />
servo1.write(0); //Posicion inicial del servo</p>
<p>}</p>
<p>void loop(){<br />
botones();</p>
<p>if (clic1 == true) { //Si el boton está pulsado<br />
lecturalaser(); //Ejecutamos la funcion lecturalaser<br />
}<br />
{ //Si el boton NO esta pulsado<br />
} //No ocurre nada<br />
}</p>
<p>void lecturalaser(){<br />
laserState = digitalRead(laser);</p>
<p>if (laserState == HIGH) { //Si el laser no esta interrumpido<br />
} //No ocurre nada<br />
else { //Si el laser se interrumpe (LOW)<br />
foto(); //Se ejecuta la funcion foto<br />
}<br />
}</p>
<p>void botones(){<br />
int dclic1 = digitalRead(boton1);<br />
int dclic2 = digitalRead(boton2);<br />
if(dclic1==HIGH){<br />
clic1=true;<br />
}<br />
if(dclic2==HIGH){<br />
clic2=true;<br />
}</p>
<p>}</p>
<p>void foto(){<br />
if (i == 1){ //Si solo ha pasado una gota por el laser<br />
delay(20); //Debounce del láser<br />
digitalWrite(camara, HIGH); //Empezamos a obturar con la cámara<br />
i = i++; //Sumamos 1 a i para que dispare a la segunda gota<br />
}<br />
else { //Si i = 2<br />
disparo(); //Ejecutamos la funcion disparo<br />
i = 1; //i vuelver a valer 1<br />
}<br />
}</p>
<p>void disparo(){<br />
if (clic2 == true){ //Si el boton 2 ha sido pulsado<br />
delay(delai); //Esperamos &quot;delai&quot;<br />
delayMicroseconds(delaim); //Esperamos el incremento en Microsegundos<br />
flasheo(); //Ejecutamos flasheo<br />
}<br />
else { //Si el boton 2 NO ha sido pulsado<br />
incrementar(); //Incrementamos la espera ejecutando la funcion incrementar<br />
delay(delai); //Esperamos &quot;delai&quot;<br />
delayMicroseconds(delaim); //Esperamos el incremento en Microsegundos<br />
flasheo(); //Ejecutamos flasheo<br />
motion(); //Movemos la motion</p>
<p>}<br />
}<br />
void flasheo(){<br />
digitalWrite(flash1, HIGH); //Disparamos el flash 1<br />
digitalWrite(flash2, HIGH); //Disparamos el flash 2<br />
delay(10); //Le damos tiempo al flash mientras recibe un impulso<br />
digitalWrite(camara, LOW);<br />
digitalWrite(flash1, LOW); //Apagamos el flash 1<br />
digitalWrite(flash2, LOW);<br />
clic1=false; //Quitar si queremos las gotas automaticas<br />
clic2=false;<br />
/*f = f++;<br />
Serial.println(&quot;Delay Inicial:&quot;); //DEBUG<br />
Serial.println(delai);<br />
Serial.println(&quot;Delay Microsegundos:&quot;);<br />
Serial.println(delaim);<br />
Serial.println(&quot;Numero de fotos:&quot;);<br />
Serial.println(f); */<br />
}</p>
<p>void motion(){<br />
delay(300);<br />
servo1.write(90);<br />
delay(100);<br />
servo1.write(0);<br />
/*<br />
Serial.println(&quot;Motion&quot;); //DEBUG<br />
Serial.println(&quot;Esperando&quot;);</p>
<p>delay(guardarfoto); //Esperamos a que la camara guarde la foto<br />
Serial.println(&quot;LISTO!!!!!!!&quot;); */<br />
}</p>
<p>void incrementar(){<br />
delaim+=incremento;<br />
if (delaim &gt; 1000){<br />
delaim = delaim -1000;<br />
delai = delai++;<br />
}<br />
}</p>
<p>
Step 7. The electronic schematic
So this is how it looks in the end:

Electronic schematic
“botón1” takes the picture and adds the defined increment to the next button-press. Using switch1 we can take several incremental pictures without having to press one by one. botón2 takes the exact same picture as the previous, without the increment, so we can repeat it if anything fails. BPW41N component is the photodiode where the laserbeam impacts on. The flash circuits flash1 and flash2 are taken from the Photoduino schematic and end up in two stereo minijacks. 4N35 (or 4n28) is the optocoupler that triggers the camera and also the “Homer keystroke”, a small Arduino-supplied servo, that pressed the space bar to synch the droplets to the Motion Control.
Step 8. Animation inside a water drop
After looking for references and discussing about the whole aesthetics of the piece, we decided to go for a 3D fluid animation that, even if organic and chaotic, morphs into very simple and geometrical shapes.
The animation was rendered and the printed to be then replaced frame by frame in the piece. In this case, since we had to end in the IdN logo, each frame was placed behind the drop upside down so as to account for the inversion inside the water drop.
Step 9. First tests
Entropy – IdN Magazine v20n2 by Physalia
Credits
Entropy – Idn Magazine v20n2
Direction and Production: Physalia
Comissioned by IdN Magazine
Audio: CypherAudio
Programming: Jordi Planas & Physalia
Making Of Pictures: Albert Treblah
Black list:
Aclam (photo rental equipment in Barcelona):
We’ve had to add them to our fortunately quite short blacklist, as they rented us a lens with a small dent that we didn’t give importance to as it was not going to interfere with the functioning, and as we didn’t point it out to them when we took it (our mistake) they took the whole deposit when we brought it back.
You can check out our other projects in www.physaliastudio.com, Facebook and Twitter, but stay tuned, as we’ll keep on publishing in-depth reviews of new and old projects!
Physalia Love.
